Download CF-Auto-Root & Make Your Rooting Dream Successful
Smartphones are very interesting and assist us to make our daily tasks easier. According to the users’ preferences, smartphone and their operating systems vary. Currently, several mobile operating systems are being used in the world and Android is the most popular mobile operating system by now. Most of the smartphone manufacturers use Android as their operating system and customized it before shipping with the device. As a result of this, users are unable to change the system as they want although the Android is an open-source platform. That is why users need rooting tools such as CF-Auto-Root.

Why CF-Auto-Root Download
As mentioned above, almost all of the smartphones are locked by manufacturers to prevent alterations on the device operating system. The key purpose of these software restrictions is to keep the device and customers safe from third-parties. Although the purpose is positive, it affects users preferences badly. Because users cannot grab the full potential of the device and satisfy as they want due to software restrictions. Installing third-party apps/games, installing custom firmware, and uninstalling system apps are completely prohibited on stock smartphones.
The only way to remove these restrictions is to root the smartphone. As you know, there are a number of smartphones and there is no single root tool to use for all these smartphones. Rooting tool varies according to the device. But CF-Auto-Root is different in this case since it allows users to root a number of smartphones using the same tool. Despite the compatibility, CF-Auto-Root is the one and only root application which can be flashed using Odin. Because Chainfire, who is the developer of CF-Auto-Root offers the tool in two versions for both Odin flashable devices and fastboot flashable devices. In addition to these facts, CF-Auto-Root is a simple rooting programme which can be used on Windows, Macos and Linux
CF-Auto-Root For Odin Flashable Devices
As you know, Odin is the official flashing programme for Samsung Galaxy smartphones. Odin flashable devices refer to Samsung Galaxy smartphones and you can root your Galaxy device by flashing the CF-Auto-Root package via Samsung Odin. CF-Auto-Root For Odin Flashable Devices comes in .tar.md5 files and it flashes a modified recovery and cache partition in order to install SuperSU and finally cache partition is removed while re-flashing the stock recovery. CF-Auto-Root only works in recovery mode and device needs to be booted into recovery mode after flashing the files. Normally, it happened soon after the files are flashed and need to be done manually if not. CF-Auto-Root requires a bootloader unlocked device and your device may brick if you flash the application without unlocking the bootloader.

CF-Auto-Root For Fastboot Flashable Devices
Non- Samsung Galaxy Smartphone users can use CF-Auto-Root For Fastboot Flashable Devices and root their devices. This version of CF-Auto-Root comes in .img files and you can boot them through fastboot commands. You need to enable the fastboot mode on your device and run the included script for your OS in order to use the tool. As same as the other version, you need an unlocked bootloader to use this version. But you do not need to unlock the bootloader yourself since included scripts do it for you. But be careful since it wipes all your data. If your device has a specific OEM unlock tool you need to use it instead of the provided solution
How To Root Odin Flashable Devices Using CF-Auto-Root
- Download and Install relevant USB drivers for your device on your Windows computer
- Reboot your computer
- Check your device model number, Build number and Android version
- Visit official CF-Auto-Root website and download the correct Root package that matches to device model number, Build number and Android version
- Extract the root package and there you will be able to find Odin executable file
- Right-click on the Odin.exe and run the programme as the “Administrator”
- Now, switch off your smartphone
- Press and hold the volume down+Home+Power buttons together
- Then, your device will reboot while displaying a Warning screen
- Press the volume up button to enter Download Mode
- Now, connect your device to the computer using a compatible USB cable
- ID: COM area will indicate when Odin recognizes the device
- Click on “AP/PDA” button on the Odin interface and place the CF-Auto-Root application and wait until the Odin loads the data
- When you see the “Leave CS” message in the “Log Box” click on the “Start” button
- Then, your device will reboot into a modified recovery displaying a large red Android logo and
- it will be rooted
- Finally, your device will reboot into Android back

How To Root Fastboot Flashable Devices Using CF-Auto-Root
- Boot Your device into “Bootloader Mode” by pressing and holding the volume down and power button at once after switching off the device
- Connect your device to the computer when arrived Bootloader Menu
- Go to the extracted root package and double-click the correct script according to your computer operating system
- Next, you will get a command prompt window and press any key to continue
- The CF-Auto-Root will do the rest of the process and the device will reboot finally
- Now, it’s safe to unplug your device
Wrap Up
If you are a Mac or Linux user who is willing to use CF-Auto-Root For Fastboot Flashable Devices you need to have chmod +x root-linux/mac.sh before root your device.
Download CF-Auto-Root – Root Over 50 Different Samsung Galaxy SmartPhone Models

A properly rooted Android device has been one of the dreams that an Android user always try to succeed. There are millions of Android users around the world by now and each second the number of users rises. Earlier, users were not very keen on rooting because they were afraid of it due to the lack of rooting knowledge. But, now users are keen on it after getting to know about it via websites, blogs and forums. Android Users read about rooting, ask questions and enhance their knowledge and finally try to do it practically. There are lots of rooting tools and applications available by now and CF-Auto-Root root application is very popular among users even though it a bit older application by now.
Why Should You Download CF-Auto-Root
You may be thinking why CF-Auto-Root is still being discussed even though there are some latest rooting tools. The main reason to discuss the CF-Auto-Root is its format. CF-Auto-Root comes as Odin flashable version and Fastboot flashable version. As you know, Samsung Odin programme is only compatible with files in .tar or .tar.md5 extensions and only CF-Auto-Root Odin flashable version can be flashed using Samsung Odin. The official site of CF-Auto-Root provide root package according to the Samsung Galaxy device model and users are able to download the package and gain root access after flashing the package via Odin.
The every time Samsung Odin and its rooting ability are being discussed, CF-Auto-Root has also been discussed automatically. There is no other root package that can be flashed on Smasung Galaxy devices using Odin. If you are willing to use Odin as your rooting programme, CF-Auto-Root is the option. But unfortunately, you cannot have the CF-Auto-Root Odin flashable zip files for all the Samsung Galaxy models.
CF-Auto-Root Features
- If you have a KNOX-enabled device, using CF-Auto-Root will trip Knox warranty
- It Roots your device keeping your device close to stock as much as possible
- Recommended to use with Samsung Galaxy firmware
- Gain root access through installing and enabling SuperSU
- Support over Samsung Galaxy 50 models and number of other models
- Installs SuperSU binary and SuperSU APK
- Use the stock recovery of the device and does not contain custom recovery
- Triangle Away and adbd Insecure are not included
- Supports Samsung Exynos4/ Texas Instruments Omap4/ Qualcomm MSM8660
- CF-Auto-Root wipes data on devices with encrypted device storage

How To Use CF-Auto-Root Via Samsung Odin
Samsung Odin is the most successful and popular flashing utility for almost all of Samsung Galaxy smartphones. Not only firmware files but also Samsung Odin can flash root packages that are in .tar or .tar.md5. As mentioned above, CF-Auto-Root available in .tar.md5 and can be flashed using Odin. In here you can learn how to use Odin with CF-Auto-Root
Odin compatible CF-Auto-Root Features
- Flashes modified recovery and cache partition
- Installs SuperSU
- clean-up the cache partition and re-flash the stock recovery
- Device must be connected in “ODIN download mode” to flash CF-Auto-Root root package
- Root works in recovery mode and device reboot into recovery mode after flashing the device. If not user has to boot the device into recovery mode manually
- CF-Auto-Root trips the Knox Warranty
System Requirements
- Samsung Galaxy device with separate kernel and recovery partition
- boot.img in standard kernel and recovery format
- A Windows computer
- Download and Extract CF-Auto-Root Package according to your device model
How To Flash CF-Auto-Root Root Package Using Samsung Odin
1 Step – Check the device model number
CF-Auto-Root packages have been offered according to the device model and you have to find out your device model before flashing the root package. Go to setting > About phone on your Android mobile and get to know the device model number
2 Step – Download CF-Auto-Root Package
After getting your device model number, visit CF-Auto-Root official site and download the relevant root package for your device according to the device model number. Extract the root package into a quickly accessible location. The root package contains both CF-Auto rooting application and Odin programme. Hence, you do not need to download the Odin separately. Right-click on the Odin.exe and run the programme as Administrator.
3 Step – Boot Your Device Into Odin Mode
Switch off your device first. Then, press and hold Volume down+Home+Power button at once. Now, connect your smartphone to the computer using a USB cable. Launch the Odin programme.
4 Step – Detecting Your Device
Odin will recognize your device and indicate it in ID: COM area. The ID: COM area will turn in to blue colour when the device detected successfully.

5 Step – Flashing CF-Auto-Root Package
Click on the “AP/PDA” button and load the extracted root application. Wait until you see the “Leave CS” message in the log area. As soon as, you get the message, click on the “Start” button to begin the flashing process
Final Word
Rooting process may sometimes cause bricking. Do not proceed without taking a device backup and using the CF-Auto-Root is at your own risk. Also, make sure to get the correct root package according to your device. Because the wrong file may cause improper behaviours of your device. CF-Auto-Root is a creation and a free distribution from Chainfire from XDA members who need to be praised at every time when CF-Auto-Root is being used.
MTK droid tools with enhancements
Today we are going to narrate our story about one of remarkable software suggestions of XDA developers. Users who worry about their MTK chipset based smartphone can use this that we call MTK droid tools.Its latest version 2.5.3 comes with several enhanced possibilities and further device support for users to easily resolve whatever trouble related to their handset.

MTK droid tools for Android
In this point, users should realize that this is a specialized Android application for those devices come with MTK chipsets. Therefore, using the application, they can carry out whatever task that we will note in the following list devoid of any complicated. Having the most recent release of the utility is important. So, download version 2.5.3 on your PC and get ready to root or else recover your handset using the easiest and the free of cost application in the web.
However, in fact, this is not a common flashing tool that we often consider. It is kind of an error fixing supporter as well. You can easily establish it on your desktop and network the Smartphone using a USB cable and transfer data wand that based a scatter file.
Features behind MTK droid tools
Root MTK devices
Bring root permission is one of key features that users can accomplish through. Using the tool root key with a single click, you can simply get root permission on your handset frame.
Backup and restore recovery
Create a backup of your recovery is no longer complicated when you know how to handle MTK droid tools. Moreover, you can easily restore the created backup there using the same application.
Backup stock ROM
Create a backup of the official ROM package can easily arrange throughout this utility.
Write and restore IMEI
IMEI number is an important part of a Smartphone for some serious cases. Therefore, if you lost your IMEI for some reasons, there is nothing to worry if you know how to manage it using this implement.
How to root your Android?

Before begin the following guide, you must concern each and every preparation step there such as charge the handset, compile a PC and a USB cable and having the latest MTK droid tools version as well an important
Facilitate USB debugging mode via Developer options of Settings app
And then use the arranged USB cable and connect the handset that you need to root to the PC
Then remain for “drivers successfully installed” notification to make certain the installation
Now you can start the procedure by run the tool application as administrator. For that right click on the file and select the certain option you desire
So then, the tool should detect the connected phone and display all the information of the handset
Now, create a backup is important if you could not arrange it before start the procedure
And then select the “to prepare blocks for flash Tool” option
At the end, use the root key to start the operation and let the handset commence it
Boost battery saving with Greenify apk download
Having an Android may not easy if tools like Greenify is not there. Unlike other operating systems, Android offers its users a heap of third-party applications to customize their devices. Though you may not agree with rooting, it does not matter for still there are tons of non-root uses as well. However, Greenify apk download is one of those wonderful offers as we clarified above which introduced to stop wasting your battery. Since it is a serious issue that users could not resolve thus far, knowing that there is a perfect arrangement is really delightful.

Greenify apk download for Android
In fact, Greenify capable to hibernate all background apps that being the reason behind battery waste of Smartphone and Tablet. Hibernate is the specific performance that the utility used to keep those applications forty winks. So then, the battery will smoothly perform and will not waste for any reason. When you are away from those apps, they will not reason to devastate your battery power at all. But behind its procedure, it will not drop those apps completely. They will function often but will not ground for battery misuse. Though there are many applications for features, this is the sole dealer which capable to support you for the particular salt away.
Greenify apk download the latest version
The latest version of Greenify contains a couple of fixes and enhancements for a better coverage. Moreover, the app now can hibernate more applications and keep those essential functions of the device such as instant alerts, alarm and so on alive. You can easily enter each app there to the list and set them to sleep until you come around. You can find out the latest version 4.5.1 from respective third-party sources and the Google Play store as well. Once settle it to the device frame, you can enter each third-party app to the hibernate list and ask the implement to keep them silent.
Changelogs of version 1.4.5
- Media playback uncovering with smart hibernation
- The app can now capture background sync chore applications as well
- Android Oreo devices will capable to accurately analyze reports
- Working app position will gain more details in freedom mode
- Android O users can now hide alerts of sticky notifications
- Moreover, Android P users got a new setup for the inner functions of the tool

Wrapping up
If you were worried about the battery consumption of your beloved Smartphone since far, do not ever waste your time. Just let Greenify resolve everything for you in minutes. All you have to do is set up its Apk app approach there on your device system and enter those background apps that you do not often move from side to side. The most recent update is the best that you must update or install when you are searching for. By the way, it does not matter you are root or not. You are warmly welcome with whatever status. Thanks to Oasis feng, you are capable to simply set up the utility on your system and enjoy the unsurpassed.
How to root using Magisk Manager?
Those who want to deal with recent and demanding root suggestions got an amazing update call Magisk Manager. Root an Android is the most excellent manner to enhance the system. Since this became a trend and advanced approach, it became popular during the first couple of years from its official release and gathered over 3 million users around the world. Its multifunction structure is the key part that it became an astonishing implement. But rooting is just one function that it holds. There are several other significant uses that you can simply deal once set up to the handset. Throughout, you can increase the default root status with advanced uses. So our story is for those fellows who hold the attention of Magisk root. Here we go.
Magisk manager for Android rooting
As we clarified above, rooting is just a single part that we can grab through. Therefore, there we have a couple of further options as well that are useful when you are crazy about having a rooted handset. Because of its special approach, it calls systemless rooting. So this is the world’s first ever systemless rooting tool. In accordance with XDA developer topjohnwu, this is the best method for users to become rooted and capture everything they love. Since all the rest famous tools can only offer you root permission, there is no doubt that all of you would like to deal with an application that can unwrap a couple of from the same doorway.
Features of Magisk manager
MagiskSU is the first part that we have to consider here since it is the one that supports the user to become rooted. And all you have to do is just tap on the specific key. And then once you become rooted, you can hide your status with Magisk Hide. So then, unlike other rooting applications, users can do both at the same time using Magisk tool. As a result of this certain option, you are capable to bypass the SafetyNet of Google to carefully bring those apps that do not support root status.
And then it is Magisk mount. Throughout, the user capable to arrange any modification completely devoid of handset partitions. The final one is a Magisk manager. So it is the part that we can use as the center that controls everything based on the application.
Compatibility of the tool
Same as any other application, there are a couple of limited Android editions that the tool can support behind. So starting Android 5.0, it recommended up to Oreo the 8th as well. But apart from that, there is no any certain device model or a brand that specified.
How to download and install?
So the first thing is to find out the certain application file from the web. Keep in mind that it comes as a free implement. Therefore, you have nothing to worry. Just download the package. It available in zip format. The installation procedure is based on TWRP method. getting the latest version of the tool can let you go through a perfect procedure.
Root any Smartphone using Framaroot Apk latest version
Here is another demanding Android rooting tool for almost all Smartphone types. The utility namely Framaroot Apk with a simple procedure based on a plain graphical user interface. The operating widely aimed exploits that based on operating systems. Those who will root the handset will be able to encounter whatsoever root-only feature such as custom ROM flash, customize the structure, bring paid applications for free, remove worrying stock apps and so on.
Highlights of Framaroot Apk
- Available for free
- Well-established and user-friendly GUI with simple and plain options
- Comes with Execute script and Unroot options
- Single-click rooting approach
- Capable to perform without the support of a computer. Thus the application can be downloaded as an APK
Download the latest version of Framaroot Apk
The latest version 1.9.3 of Framaroot available for free that can be download from any respective source. SuperSU now works with 1.99r4. And Czech translation with efit^cz as well has been updated. Almost all devices that contained exploits which have been arranged with the utility will faultlessly become rooted.
PC suggestion
As we clearly said above, Framaroot is just an APK type application. Users do not need to compile a Windows computer like all other PC-based rooting tools. Thus far, there is no any further detail that the developer will release such a desktop-based arrangement.
Root any Android without a PC
Preparations
- Charge the phone for it mustn’t shut down before the process end
- Backup all files
- Allow Unknown sources
- Disable if you have any antivirus guard
The procedure

- Here is the complete guide to root using Framaroot. If each and every preparation is completed, go ahead.
- Turn on data on your device
- Launch the browser and search for Framaroot download
- Once you settle it, install to the system. As often, the icon will state on Home screen
- Once you click the particular icon, the interface will open
- Exploits that detected from the handset system will list right away. So you should select an exploit to move
- As next options will display as Install SuperSU, Unroot and Execute Script options, put your finger on Install SuperSU for the rooting procedure
- So the operation will run during next few minutes. At the end, reboot and check whether SuperSU app has been installed
Important facts of Framaroot Apk
- Those who fail the first effort have nothing to worry. Since there should be few more exploits that shown in the prior list, you can try out them as well. So return to the starting session and enter the rest exploits as well one by one. Even some may not work properly, there should be one certain use that can make the handset a rooted.
- Those who did not get any exploit from the very beginning, unfortunately, cannot use Framaroot. It will grab all that similar to the list it contained. Once the exploit list is empty, you should navigate for some other solution or stay for an update of this utility in the near future.
Developer Credits
Framaroot Apk is another great rooting solution derived from XDA developers. Those who desire further clarifications can refer the XDA forum.
Root Samsung with CF auto root
Hello everyone! We are back with the complete guide for Samsung users to root their cherished smart devices with brave and well-established CF auto root. This utility is a significant one when it comes to HTC, Sony, Samsung and Huawei models. When you are a Samsung user, it is better to recognize for it can use as a tar file to drive through Odin download. It will open the door to setup SuperSU. It contained APKs and Stock recovery as well. However, this demanding utility is an offer of well-known XDA developer Chainfire.

What’s more?
Chainfire rooting project has been established a few years back and still remain its beta testing assembly. From the very beginning, it became an application for a couple of Android device replicas in the market. Once we consider root Samsung Galaxy types, it is an important topic and that cannot overlook for any reason.
As this operation has to use Odin as well, Windows PC is a requirement and that should perfectly install drivers and all. This utility has been introduced as a good application for beginners. Behind this, there is no any APK deal. It is a computer-based ride. There is a long list of files that you can search the specific in accordance with your device model number from the formal site.
Important facts to remember
- CF packages currently remain their testing session that operators should work at their own risk
- Download the particular file in accordance with your handset model from the official host. The wrong file will lead to a bricked handset
- This procedure will trigger those flash counters on your handset systems. But rarely, it will ignore the counter and leave you safe
- Those devices with encrypted storages will land without any data away. Thus, backup is important
System requirements for CF auto root
- Download Chainfire package from the official website and extract it
- Compile a Windows PC
- Download Samsung Odin and it as well has to extract as recommended
- Install Samsung drivers to the computer
- Put the Samsung handset into download mode
CF auto Root with Odin
In this guide, we are going to root any Samsung Smartphone with CF auto root package. The procedure is not that long or complicated for users of Odin. Having the certain packages are vital to lead the procedure to the success.
- Run Odin exe file as administrator
- Connect the device to the PC
- And then you can click the particular AP button
- It will open a window to browse a tar file. There you have to load CF auto root as a tar file from the extracted list
- And then sit tight patiently once the utility ready to flash the handset. You can see the Odin UI update details. Once you see “Leave CS” there, Tap the “Start” key right away
- Around ten minutes, the procedure will come to an end by rebooting the Smartphone
That’s it. Now you have been rooted the system. From now, you can enjoy everything related to root-only and even draw all hidden features.
Kingroot apk Download
Kingroot is one of the leading android rooting tools used by over million of android users all over the world. Kingroot apk is compatible with any android device powered by Android 2.3 to latest Android 5.1. The frequent Kingroot updates supports fixing the bugs and issues the users have to face. Hence, kingroot is free of hell of troubles other android root users are to deal with.

KingRoot apk provides better rooting privileges by customizing the system as the user expects. KingRoot can speeds up android system performances and KingRoot apk doesn’t lose any mobile data like in other rooting software. Further an internet connection is not needed for making your mobile device rooted. Thus, it is clear Kingroot is much user-friendly and smart android rooting software you can ever have. You can download KingRoot Apk for your android smartphone directly or download Kingroot PC for a perfect android rooting.
- You can download the latest available APK or PC version from www.kingroot.org.
Android Kingroot Latest Features
- Speeds up the system performances
- One click root feature
- Auto Start manager
- Uninstalling Bloatware
- Archive notifications
Kingroot Android is supportive for rooting any smart mobile device without a PC, using kingroot apk version. It is an outstanding feature that Kingroot can detect the connected mobile device automatically as soon as the device is connected. What you have to do beyond that is quite simple. Install the app and run kingroot, following the instructions on the screen leads to the successful mobile rooting appearing SuperSU as the ultimate result.
How to Root Android Smartphone Using KingRoot
- Go to “Settings” > “Security” > “Device Administration” > Tick “Unknown Source”.
- Download KingRoot apk version. (Downloading the latest compatible device will make a better rooting.)
- Install Kingroot app.
- Then you can see “KingRoot” icon on launcher menu.
- Click on the icon and open the software.
- Tap on “Start Root” to start android root.
- Android KingRoot starts android rooting.
- At the end of the rooting, you can see a BIG GREEN TICK on the screen.
- Restart mobile device and you will see “KingUser” app on Home screen.
Video Tutorial on Android Mobile Root Using KingRoot
Kingroot android root, one of the best rooting software supports one click root facility. You don’t need to go to several menus and clicks, just by a single click kingroot starts rooting the mobile device. Download the latest kingroot versions comprises of enhanced features. Follow our video tutorial to root your android smartphone successfully.
KingRoot Apk FAQ
- Should I turn on the mobile data to complete the rooting while mobile Wi-Fi is on?
- Yes. You must turn on mobile data to download compatible exploit for the device.
- Is kingroot PC version better?
- It does not depend on system exploit but flashing a ROM with Su binary is possible.
- Once the tool is installed then why KingRoot can’t be removed?
- After rooting, system protection is enabled. Hence, you can’t mount the system.
- If KingRoot can’t be uninstalled how can I update the system?
- Force stop KingRoot.
- Clear app data and root mobile once.
- Go to General Settings > tap “Uninstall KingRoot”.
- When kingroot window appears, uncheck “Backup Root “option.
We would like to thanks, KingRoot Team for latest updates and root guide on Kingroot apk.
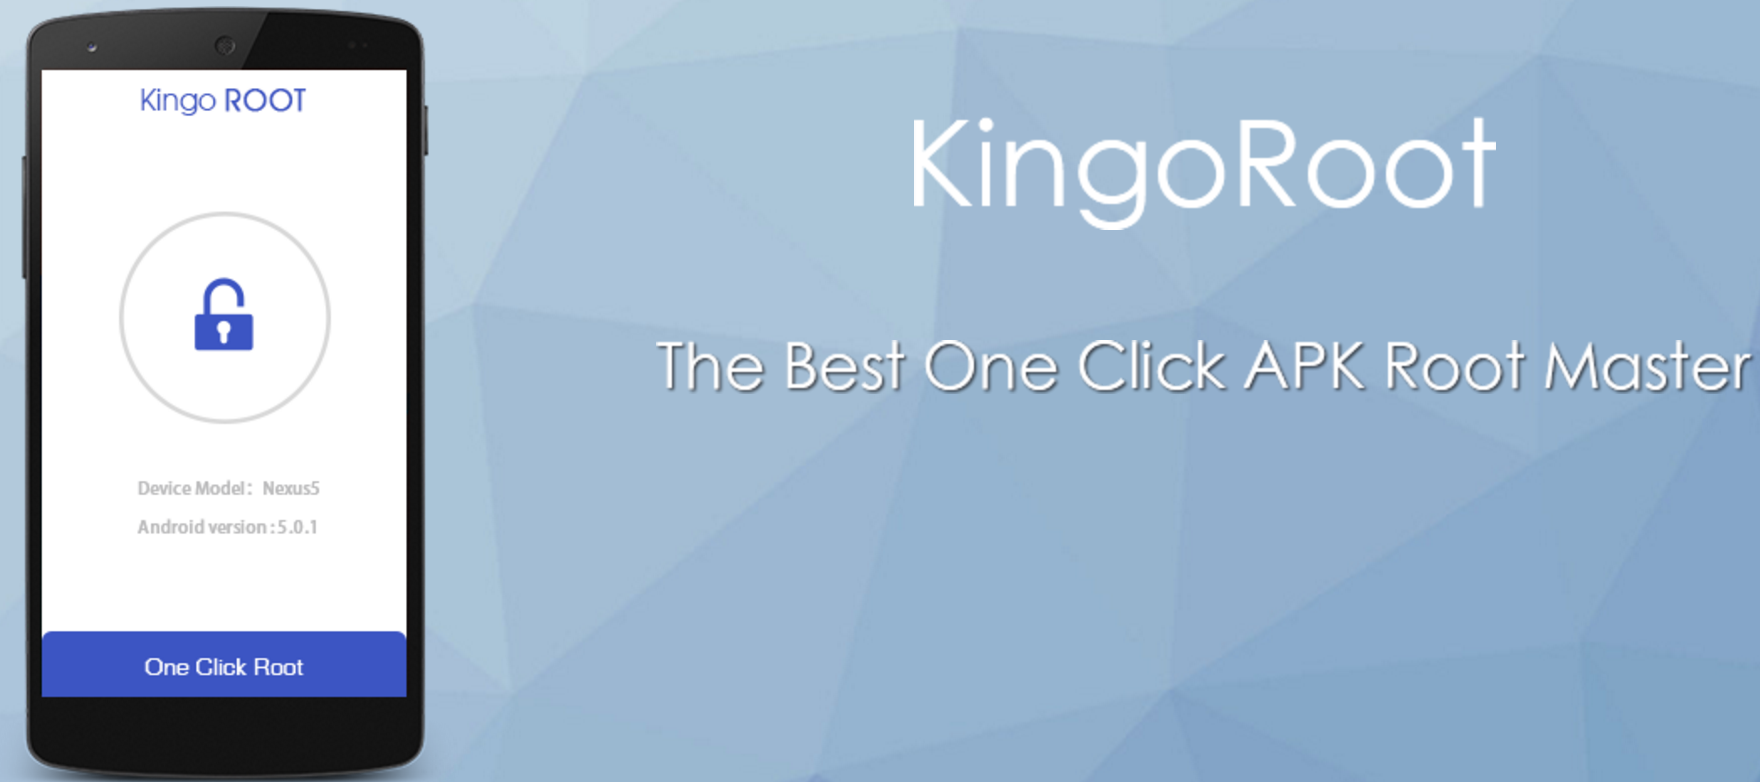
KingoRoot APK Download – Best Android Rooting tool
Kingoroot is the fastest modifying android rooting tool that all android users must need to have. Android Kingoroot apk, the best one click root tool needs only a few steps to root your mobile device. KingoRoot installation is much easier as well as faster. Kingoroot apk download is free not only that but also kingoroot can download updates and device drivers automatically.
Kingoroot apk is compatible with Google galaxy, Google nexus, Samsung Galaxy, LG, Acer, Huawei, Sony Xperia and other mobile devices. Further kingoroot apk download is ready for any Android OS including Android 5.1. Android KingoRoot is frequently updating the versions to fix bugs and issues the earlier versions had. Hence, it is no wonder to call android kingo root as a highly recommendable rooting software any android user can utilize.
Kingo Root Download
KingoRoot PC supports both Windows 64 bit or 32-bit versions and you can get kingoroot apk version for mobile devices as a freeware.
- Download KingoRoot PC
- Download Kingoroot apk
Why You Need to Download KingoRoot
- Hidden features unlocking
- Ad Block facility
- Uninstalling the bloatware
- Privacy protection
- Faster performances
- Longer battery life
How to Root Android Smartphone with Kingoroot
- Download KingoRoot PC.
- Install the software and run Kingoroot PC version.
- After Enabling “User Debug Mode” on mobile device connect it to PC using the USB cable.
- Then kingoroot will check for new updates and if any it will automatically install them.
- When “Root” window appears tap “Root” button.
- Tap “Finish” button to complete the rooting process.
The outstanding feature of android kingoroot is the synchronization of mobile data to another secondary app before mobile rooting starts. Hence, you don’t need to afraid of losing your data and need not to spend your time with making data backup.
Video Tutorial Kingoroot Android Rooting
To have a smarter android device is not a complex process now. It is just a few clicks and couple of minute you need to spend. Android kingoroot apk is the most perfect solution for rooting your android smartphone providing the best opportunity to dive in to system changes as you wish. Download kingoroot for your android device and experience the freedom of your own within Android.
Never give up your chance to get free kingo root download. You will never regret on why you spend your data to download kingoroot. Get the most compatible kingoroot version for your mobile and root the device in a second.
We would like to thank Kingo Root developer team for releasing the latest updates and news on android kingoroot apk.
How to root galaxy J5 SM-J500F [variants]
Samsung Galaxy J5 is a top performing android smart phone with latest features. Android J5 comes with 5 inches super AMOLED display. The device is powered by 1.2 GHz quad-core processor and possess 1.5 GB RAM. Samsung Galaxy J5 is running on Android 5.1 Lollipop OS. But although you have all those facilities you are limited to a certain boundary for not exceeding the customization of the device. By default, you can only change the settings that you are allowed to access and you can’t have the best experience in customization of android device.

Root galaxy J5 supports installing custom recovery files and CWMs. By rooting your J5 smart phone, you can speed up the system performances. Further android Galaxy J5 rooting supports unroot the root J5 mobile without bringing bricked and any damages. You can have the full access for the best optimization opportunity with Samsung Galaxy J5 root. Follow our complete tutorial for a safer android rooting guide.
Prerequisite on Samsung Galaxy J5 Root
- Create a data backup of the device.
- Download Samsung Galaxy J5 USB driver and install the derivers on the device.
- Go to “Settings” > “Developer Options” and then enable USB Debugging mode and OEM unlocking.
- Keep a sufficient battery life (60% – 50%)
- Deactivate your antivirus guard temporary.
How to Root Samsung Galaxy J5 with CF Auto Root
- Download CF Auto Root for your Galaxy J5 device based on the build number. Go to “Settings” > “About Phone” and get the build number.
- Extract the downloaded CF Auto root file.
- Power off the mobile and press and hold “Volume Down”, “Home” and “Power Button” together and boot in to download Mode.
- Connect the device to PC with a USB cable.
- Run CF Auto Root file and click Odin3. exe file and run the application.
- You will see “Added” message in Odin if you have installed USB drivers for the device.
- ID: COM bar will fill in blue color.
- Click “PDA” and select .tar.md5 file form the extracted folder.
- Click “Start” and start jailbreak Galaxy J5.
- Your J5 device will automatically reboot after a successive flashing and you can see a PASS message in green in Odin.
Video tutorial – Root Galaxy J5 (Cf root method)
Samsung J5 comes with the factory customization settings. To have the best experience in your J5 device all you need to do is to root galaxy J5 with any android rooting software. You can use CF Auto Root, SuperOneClick or Towel Root app. Follow our guidelines for a simple but complete tutorial on Galaxy J5.
Credits for Android Galaxy J5 Root
Credits for Samsung Galaxy J5 root tutorial goes to Free Android Root developers.